First of all, let me just say: I am so. excited. about this post!
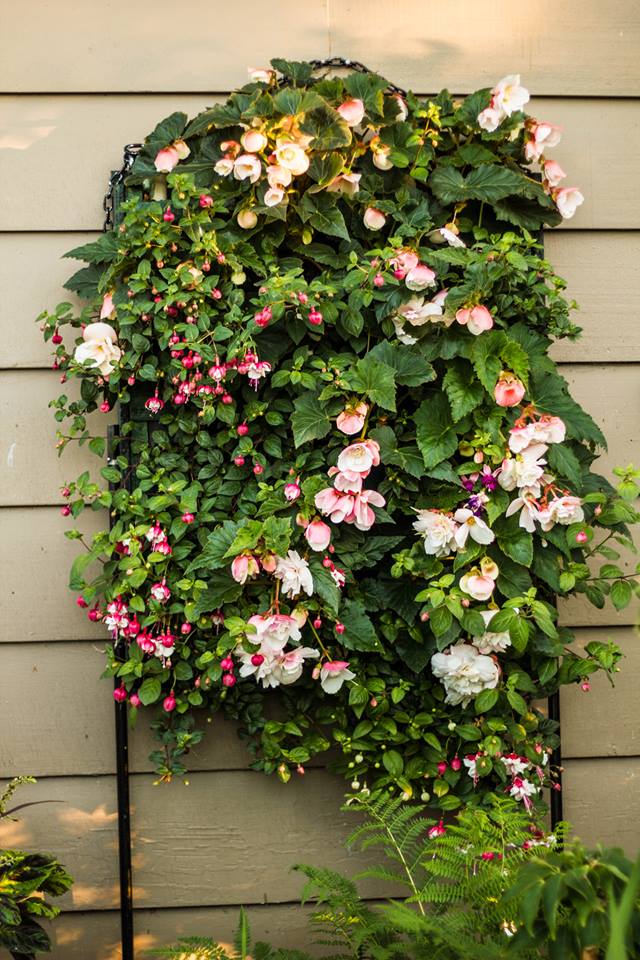
Last summer, Holland Bulb Farms contacted me about one of their many amazing customers: Marie. Marie lives in the Pacific Northwest, not far from the Canadian border where she works at a surgical center during the week and out her garden most evenings and weekends. She was kind enough to post a photo of her “vertical garden” on the Holland Bulb Farms facebook page and it really caught our attention! Vertical gardening has been steadily gaining in popularity — and rightfully so! It is an incredible way to garden in small spaces and is also an ideal way to break up a blank wall or other boring section of your outdoor space. After seeing her incredible creation, we decided to reach out to her and see if she would be willing to share some more in-depth information about her “flowering pallet” and also provide me with some step-by-step instructions to share with you. She graciously accepted and now you get to reap the benefits!
Q. What materials do you need to build this pallet board?
A. Materials: A pallet of any size, whatever you desire. Landscape fabric, Plastic sheeting, plywood, a 1″ x 6″ board (long enough for both sides & bottom of pallet), 1”pvc pipe, ¾” conduit pipe, chain, 4 pipe straps, chain, 2 eye hooks and a clamp to attach the chain to the eye hooks (a regular hook will also work).
Tools: A skill saw, drill, drill bits, screws, hammer, nail puller (cat’s paw), sander, glue gun and glue sticks.
The amount of material needed depends on size of pallet.
Q. Is this your first pallet board planter project?
A. No, I tried one last year. I am still using that one (it is a small one) but will be taking it apart this coming spring and redoing. I am learning by trial and error. Getting the watering system down is probably the hardest part of the whole project. I am still learning on that one. I have come to the conclusion that I need to pour water in the pipe before attaching it to the pallet to make sure it will work the way I would like it to work. I am having a lot of fun with them and loving the end results.
Q. What, if anything, would you do differently next time?
A. I would drill fewer holes in the bottom of the pvc pipe that I use for watering and also wrap it with landscape fabric so that the water does not push the dirt out. I also used whatever we had around the farm, which was using 1 ¼” pvc — I know now that it definitely needs to be smaller. My husband & son have also suggested maybe using a soaker hose, but were talking about a flow meter and this sounds a little too difficult for a project that was supposed to be cheap and easy (lol)! I love their advice, though and if they design something for me, I just may try it in the future. I would definitely try the watering system out before gluing it in the pallet board. Other than that, I am pretty happy with the results.
Q. How many total tubers and plants did you use? Did you start these tubers and plants somewhere else prior to installing them into the pallet board?
A. We had a very wet spring last year in the Northwest, so I started the begonias in my living room on a portable table in front of my window with a grow light. At the time, I was working at our local TrueValue store which also sells plants so I picked up the fuchsias from there. I have approximately 30 total plants in the finished pallet. Obviously, the number of plants will vary based on the size of the pallet. I try to put one in between each pvc pipe that I used for watering.
Q. You mentioned that you used begonias grown from tubers and supplemented with some fuchsia. Have you ever tried/considered using any other type of plants/bulbs?
A. I have not tried anything else as of yet. I do want to try maybe million bells or something that can take lots of sun. I have an exterior wall on the south side of my house that has no windows and think a flowering pallet could really dress it up. I have toyed around with maybe making 2 and putting them side by side and using red, white and blue flowers and planting it to resemble of the American flag. It would also depend on how much spare time I have. Working full time can take some of that precious play time away.
Q. How much water/fertilizer and up-keep does this require?
It actually requires less time than what it appears it would. My pallet is on the North side of the house and is very shaded, so I water about once every 4 days. About every 3 weeks I will water once with Jacks fertilizer. This seems to be working. It is very easy to over-water. I generally stick the hose in each pipe and water until the water comes out of the top and then off to the next pipe. This seems to be working fine. This is why there needs to be fewer holes at the bottom of the pipe than on the top. In the picture which I provided, there were too many holes and I had to plug some back up.
Ready to build your own flowering pallet? Follow Marie’s steps here:
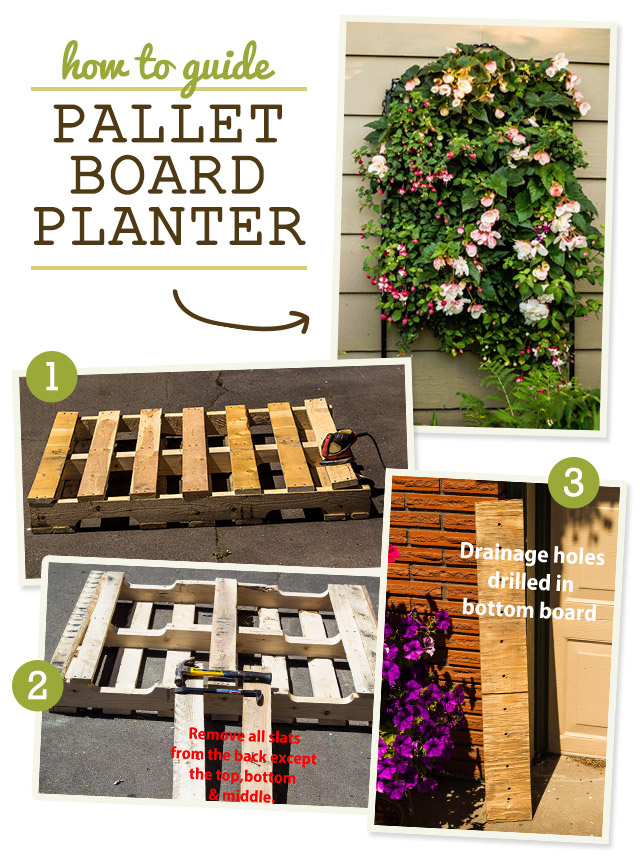
1) Find a pallet from a nearby nursery, factory, or other business (most will be more than willing to get rid of one!). Clean the pallet and perform minimal sanding to make it look nice.
2) Remove extra boards from the back of the pallet.
3) Drill large holes in a 1×6 board for drainage and screw to the bottom of the pallet. Marie’s tip: Be sure to drill a pilot hole before inserting screw.
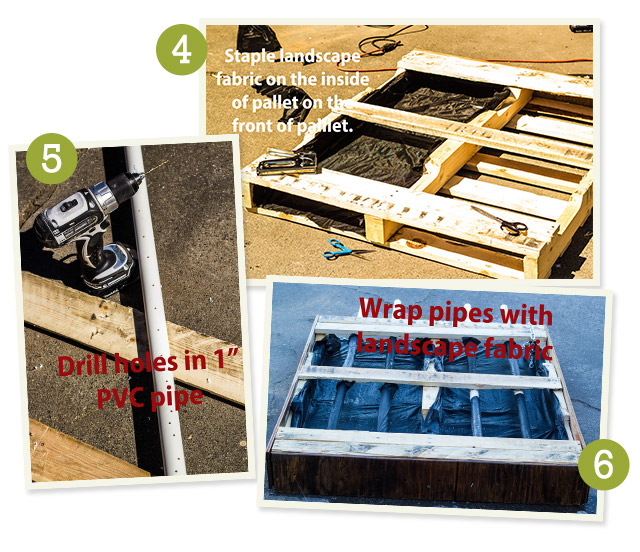
4) Staple landscape fabric to the inside front of the pallet — use lots of staples! Cover the drainage holes at the bottom of the pallet with the landscape fabric so that the dirt does not drain out. Coffee filters also work to cover these holes.
5) Drill holes with a small drill bit on each side of the 1” pvc pipe. Marie’s tip: Use a drill bit long enough to go through the pipe on both sides resulting in two holes for best results!
6) Test the water flow; make sure that the water will make it to the top of the pipe and that not too much is lost out of the bottom of the pipe. If too much is coming out of the bottom, a few holes may need to be plugged.
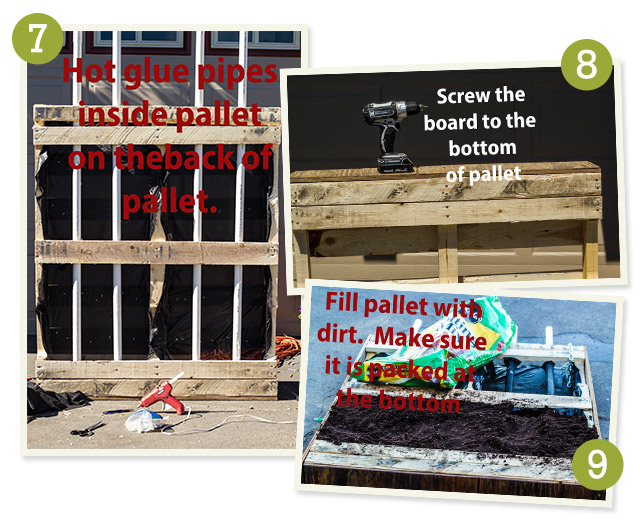
7) Wrap the pipe with landscape fabric so that it will slow the flow of the water coming out of the holes.
8) Glue the pipes in the pallet with a hot glue gun or other strong glue. Space the pipes evenly so that all plants will receive water. Make sure that the drilled holes in the pipe are not facing the front and back but rather side to side. Be sure that there is enough room between the pipes to place the plants.
9) Screw 1×6 boards on the open side(s) of the pallet to make the sides even and closed. Marie’s tip: Be sure to again drill small pilot holes before inserting the screws as pallet wood tends to be weak and often can crack.
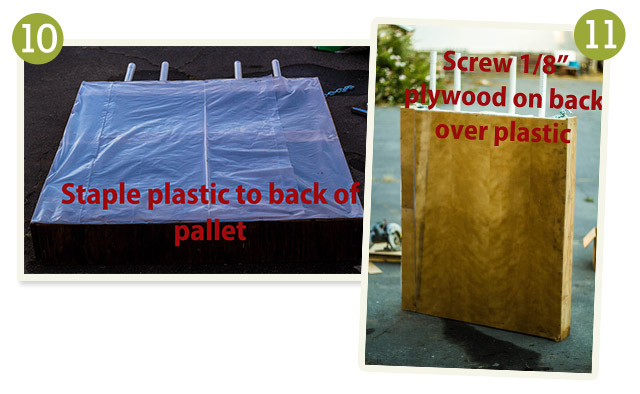
10) Fill the pallet with dirt, being sure to pack it down at the bottom.
11) Staple 4ply plastic sheeting to the back of the pallet. Marie’s tip: Use a double layer of plastic sheeting for extra protection as this will not only protect the plywood used on the pallet in the next step but also whatever structure you decide to use your flowering pallet on, such as the side of your house.
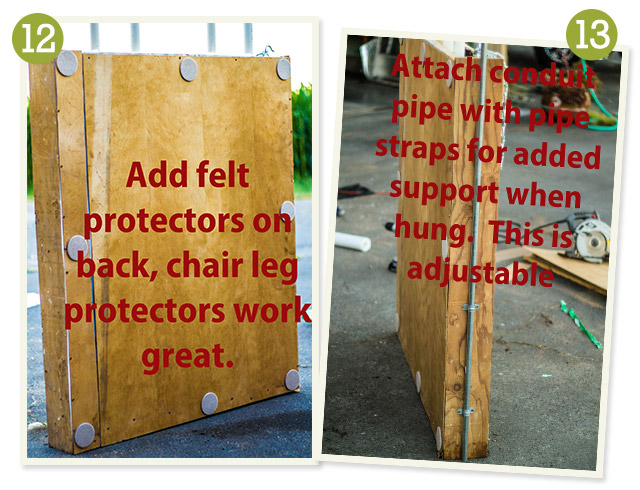
12) Attach plywood to the pallet back with screws. Once again, make sure you drill pilot holes before inserting screws.
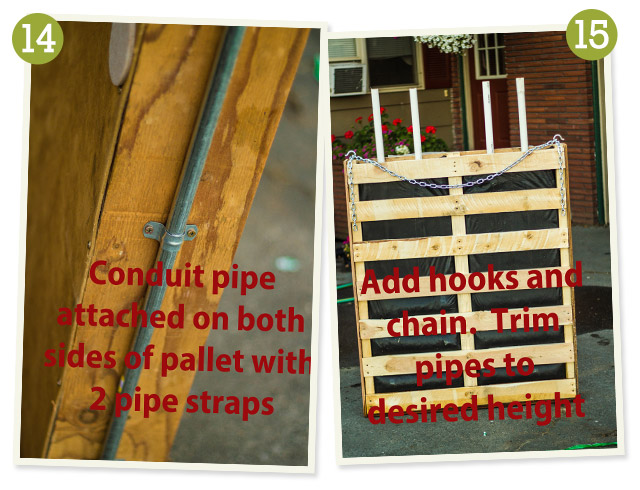
13) Apply finishing touches: place felt guards (such as those used for chair and table legs) on the back to again protect the structure it leans against, attach 2 hooks on the top of each side of the pallet (drill pilot holes) and attach the chain. Marie’s tip: I also attached the conduit pipe with 2 pipe strappings on each side closer to the bottom of the pallet. These are adjustable depending on the height you would like to hang your flowering pallet.
14) Optional step: For a more finished look, apply wood stain to the outside of the pallet. Marie used Woodsman semitransparent oil stain purchased from TrueValue.
15) Now you are ready to plant! Use a box knife and cut an upside down T between each pipe and slats of the pallet board. Tuck the roots of the started plant down so that it is behind the bottom slat. Next, cut an upside down T between the next slats above the first one and push the dirt down on the plant roots below. Add more dirt as you get closer to the top of the pallet.

Once again, THANK YOU to Marie for sharing this great weekend project with us and taking the time to put together the step-by-step instructions and photos — I can’t wait to make mine!
Besides being featured on the Bulb Blog, Marie also received a $50 shopping spree to Holland Bulb Farms. Do you have a garden project or idea you would like to share? Feel free to email me at bridget@bulbblog.com and you may just find your project on the blog!


